For those who have found themselves reading here on the Zewski Corp webpage, my name is Alex Daquinag. I’m wrapping up my four-week term here as an intern at Zewski Corp by writing this blog post to share with everyone my experience and what I’ve learned this summer.
My Journey of Understanding PLCs
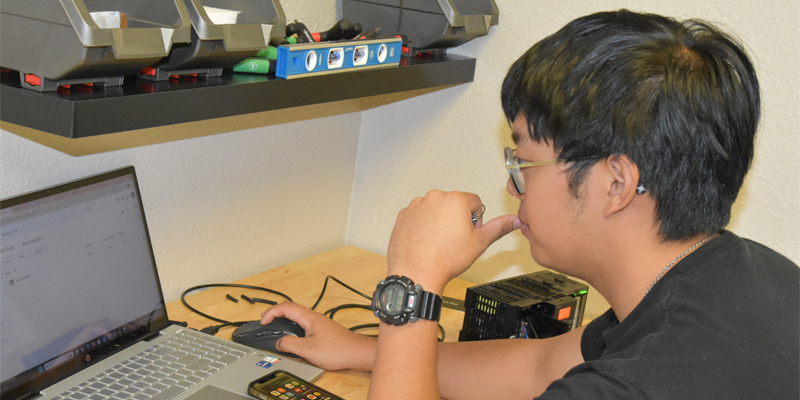
The most prevalent project and one I spent the most time with, was on the Programmable Logic Controller (PLC) that we bought for use with the Bioptek project. A PLC’s job in the industrial field is the control of a system’s functionality using the internal logic programmed into it. There are many applications and use cases for a PLC that involve the automation of systems such as assembly lines and manufacturing processes, traffic light controls, and elevators and escalators. Almost any mechanical process required to be automated can be programmed by a PLC. In my specific case, the PLC finds use in the medical field, in which it is used in conjunction with a sensor and camera to scan and gather image data of tissue samples to calculate their volume and other specifications.
The PLC model used in the project was the KV-8000A from Keyence, which came with other parts essential to a PLC, such as a power supply (KV-PU1) and input and output modules (KV-B16XC/B16TCP) for the devices needed to be controlled. After connecting these modules in the right configuration, I subjected myself to the long list of video tutorials for the software logic used to control the PLC, Keyence KV Studio. KV Studio, much like very many other PLC software utilizes ladder logic, which uses graphical representations of circuitry logic elements, such as contacts and coils, arranged in a ladder-like format to create control logic for input and output devices connected to the PLC.
Getting the laser sensor we had on hand to connect with the PLC was an arduous task for me. In hindsight, the wiring itself was simple and I overcomplicated a lot of things, but I would attribute the true difficulty of the wiring process to the lack of available resources for a beginner like me, as well as Keyence Customer Support. Despite being relatively friendly and helpful, representatives used a lot of terminology I was unfamiliar with, but after prefacing calls with my position and newness to their technology, their explanations became easier to understand. Sometimes the calls could get kind of lengthy, with one lasting up to 40 minutes.
Thankfully, these calls were not in vain, and I was finally able to get the laser signal input registered to the PLC and successfully code it to a virtual output in the software.
Learning the Art of Vacuum Forming and Defeating Webbing
I also worked on machining breast displays for a client using vacuum forming. I learned how to operate a vacuum former, as well as how to heat the plastic used for the part incrementally to not burn or overheat it. A problem we ran into when first getting decent-looking parts for this display is something that occurs in vacuum forming called webbing; when unwanted lines or pleats appear in the finished product. Our first rough iteration of the forming layout involved four cylindrical containers near the corners. This caused the heated plastic to hit the cylinder containers first before touching the display part. This iteration of the forming layout was not very consistent, as I could only get one good form without any webbing at all, and the other form I got without webbing did not stick well enough to the part underneath. After some research to mitigate this, I suggested surrounding the part with a larger outline of itself to act as a male mold that could create a recession where air would vacuum into. Larry and Tyler had the male mold designed and cut with the CNC the next day and when I put it on the layout, it formed perfectly the first time. I was happy to see that it worked very consistently for the next few forms that were required of the project.
After forming the parts I removed them from the mold and assembled them onto the acrylic pieces that we had cut on the CNC for the vacuum formed parts to be placed on. The parts ended up not fitting as perfectly as we had planned, so we were resourceful with the equipment we had in the shop and used the belt sander to file down the vacuum-formed part and the acrylic as needed.
Circuitry with Humidity Sensors
In my last week here, I was assigned to contribute some work to the humidifier project, which aims to resolve the medical issues caused by chemotherapy and other immunotherapy side effects in patients. I worked on a model that hypothesizes the actual humidity level needed or how little humidity there is. I am using a rubber and foam human model and attaching the sensors in holes I drilled out of body to simulate where we want the humidity to reach. I might be able to work on it the week after but so far, I have all of the wiring done for the humidity sensor, lengthened so that the breadboard is accessible.
An Incredible Learning Experience
This concludes all of the projects I’ve spent my time learning from here. I’m thankful for this opportunity that I’ve had here at Zewski Corp. In the brief period I’ve been a part of the firm, I’ve learned so much from a multitude of experiences and challenges. I’m looking forward to applying what I have learned here in future endeavors as I continue my degree and career as a prospective engineer. This workplace has been a great environment to nurture my growth as an engineer, and for that, I am truly grateful.